box on table 3d drawing
In this guide, you lot'll learn the steps and procedures required to design and implement a full Revision Table on the face of a SOLIDWORKS PDM data carte du jour that updates rows as part of the workflow as well as the Revision Table found on the face of the drawing.

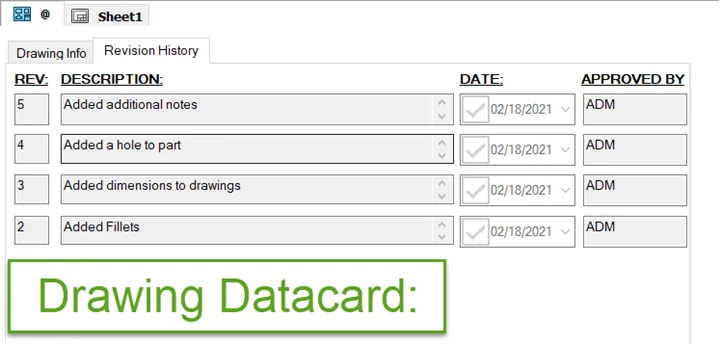
With a typical example of Revision Table integration with SOLIDWORKS PDM, only the most recent row is even so editable and in sync with the drawing file. We have now added additional rows that showcase and store previous row values as read-only—similar to how the table might work on the face of the cartoon itself.
Related >> Creating a SOLIDWORKS PDM Revision Table
Prerequisites
- A SOLIDWORKS Cartoon/Drawing Template that uses a Revision Tabular array
- SOLIDWORKS PDM 2022 or newer
- A PDM File data card that is enabled for the .sldrw extension
- User rights to edit, relieve and create PDM data cards, Variables, and Workflows
- A workflow with, at minimum, two states and transitions between said states
Creating a Drawing Template
Here'due south how to add a Revision Tabular array to a SOLIDWORKS Drawing and save it equally a template and sheet format for standardized utilize. Additionally, this has to exist an actual Revision Tabular array characteristic equally seen below.
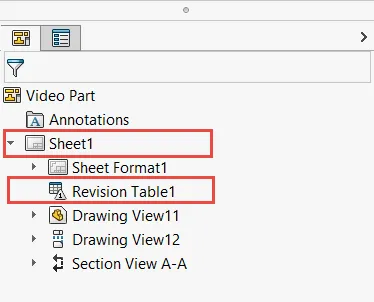
This procedure will not work with PDM if our revision table is only a bunch of drawn-in sketch rectangles or a generic tabular array characteristic.
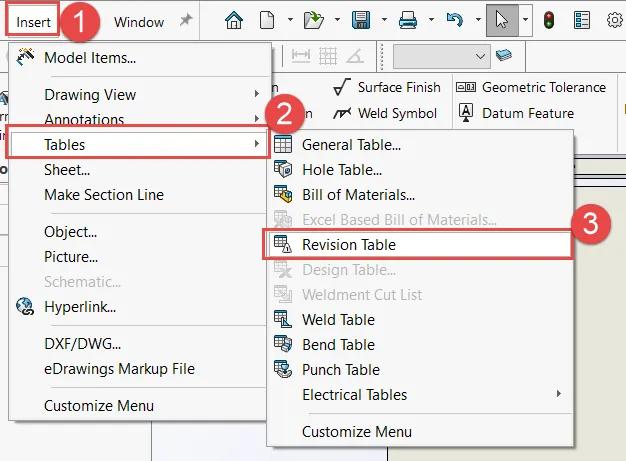
In a Drawing, use Insert >Tables > Revision Tabular array.
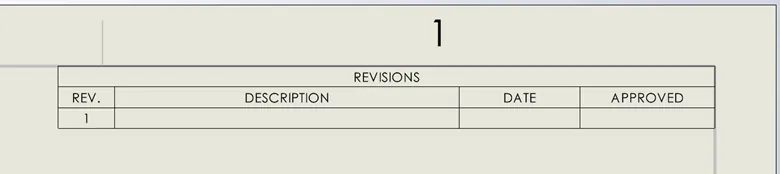
Once you accept the revision tabular array in place, decide what columns are needed in advance and how they should be filled out (either past default when a new row is generated or manually past the user).
For this example, I want a new empty row to exist generated whenever a cartoon is sent dorsum to WIP in social club to commencement a new release. The merely value that I want prepopulated is the Revision column, which showcases the next revision/release the user will exist working toward. See an example beneath.
![]() Picket >> SOLIDWORKS PDM – Custom Cavalcade in Rev Table
Picket >> SOLIDWORKS PDM – Custom Cavalcade in Rev Table
One time yous've finalized the design of how the revision table ought to look on the drawing, utilize the Insert new row selection to create the kickoff empty row and make certain to use your initial revision value. This fashion, when a new user uses this file template to generate a new cartoon, they will non have to insert and appropriately format the table themselves and information technology volition be immediately interactive with the drawing information card.
And then, go ahead and salve this cartoon equally a Template using Relieve As > SOLIDWORKS Drawing Template (.drwdot).

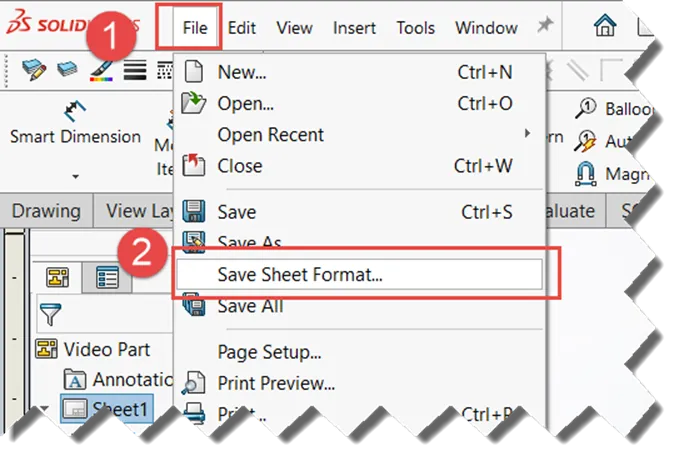
Salvage the sail format using File > Save as Sheet Format (.slddrt) in their desired respective locations. And, if desired, right-click on the table and select Save Equally > Revision Table Template (.revtblt.).
Necessary SOLIDWORKS PDM Permissions
While the default admin account is what is being used to create these configuration changes, (it is unlikely that anyone outside of an admin role/permission would exist reading this anyway), you need at minimum these Administrative and Folder permissions as seen below to implement the changes detailed in this guide.
Administrative Permissions
- Tin can update variables
Folder Permissions
- Can update the design of cards
Turning on Revision Table Integration in the Admin Tool
As mentioned previously, SOLIDWORKS and PDM 2022 or newer is required for this characteristic to piece of work as that was when Revision Table Integration was first introduced. This characteristic, in one case enabled, allows only the most recent row of the Revision Table on a cartoon to be filled out using the SOLIDWORKS information card and vice versa. Additionally, it as well allows PDM to generate new rows on the revision table when triggered by a workflow activeness.
To turn this feature on, become to Administration >Your PDM Server Proper noun > Your Vault Name > Login with admin/equivalent credentials. Commencement by going to and expanding the SOLIDWORKS node.
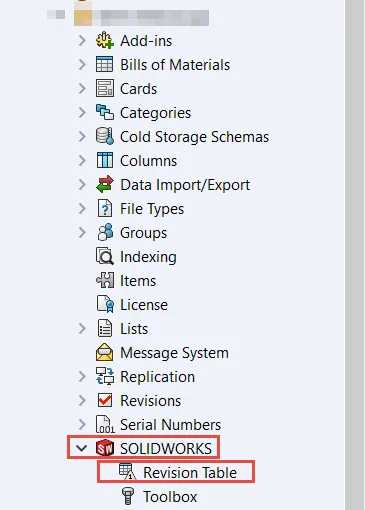
Then open the Revision Table characteristic and select Enable Revision Table Feature .

Hither is where we decide the maximum number of visible rows earlier nosotros will allow in the cartoon earlier older rows become deleted. For this example, I will use four rows with a placeholder value of * as I utilize a simple Numeric scheme for the revisions.
We have to decide the number of rows hither because that is how many "rows" will exist emulated in the carte itself.
Creating the Variables and Controls in the Data card
Now to go to the variable and information menu setup. Information technology's by and large considered all-time do to create your variables ahead of fourth dimension rather than as yous are designing your data card on the fly. This is generally because this method saves on a lot of clicking afterward in the Card Editor.
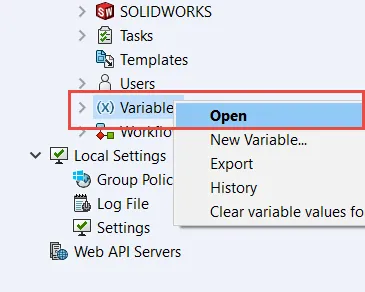
In the Admin Tool > Variables > Right-Click > Open.
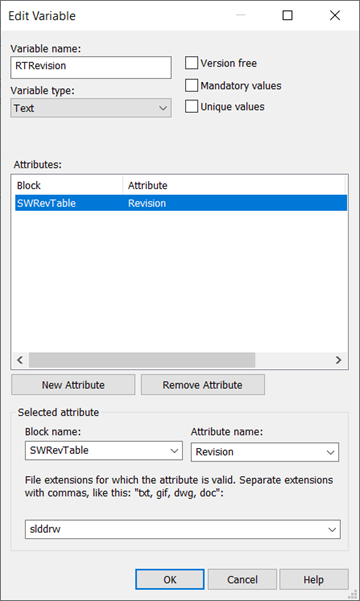
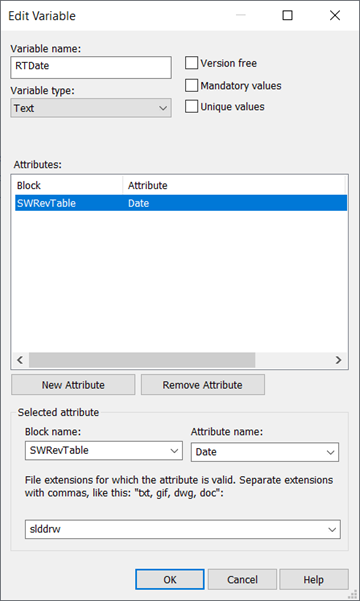
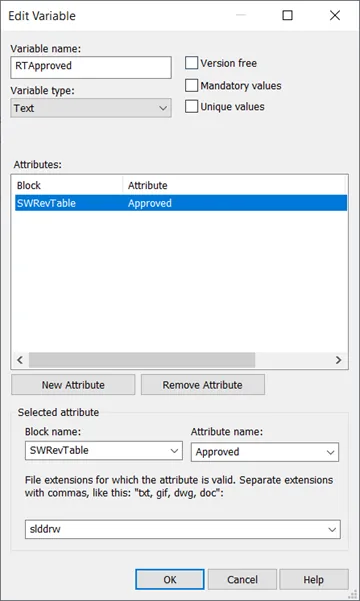
The first few variables are the nearly important, as they carry the SWRevTable mapping that allows them to collaborate/populate the latest row of the Revision Table of the drawing itself.
For case, for the Revision column I will make a defended variable RTRevision with the sole mapping of SWRevTable to Revision for the file extension ".slddrw" and echo the process for each of my other columns of Clarification, Approved, and Appointment.
To speed upward this process, just utilise the dropdown bill of fare to select the appropriate SWRevTable block menu and Attribute name. Run into as shown below.

Note: While it is possible to embed the SWRevTable mapping into other variables with other mappings, it's far easier to go out them as completely split up variables. The reason for this is that we do non desire any write to a variable to change an existing field in the revision table or unintentionally create a new row.
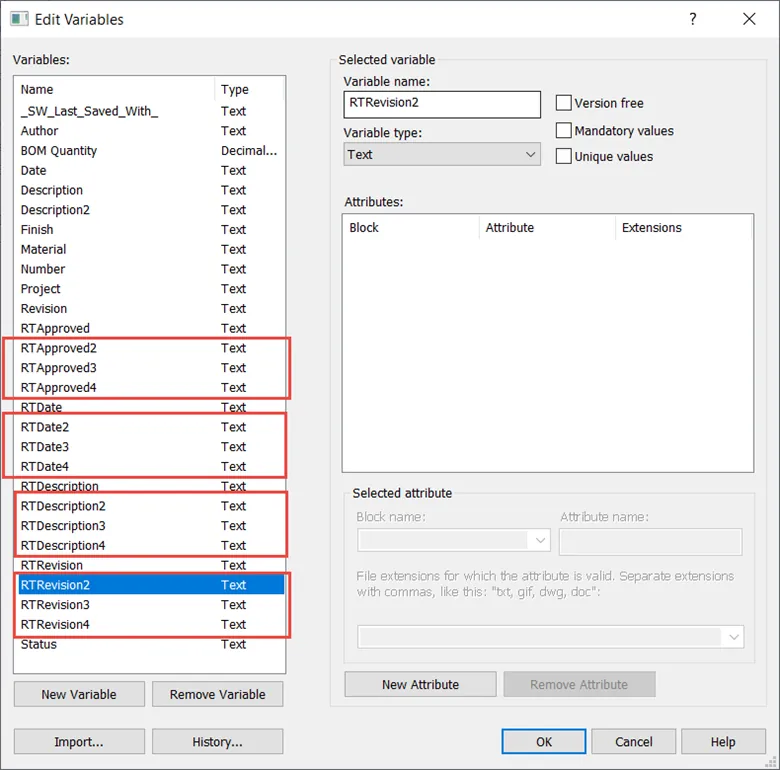
To emulate the presence of the other "rows" we volition simply need to create similarly named but sequentially enumerated variables with no mapping. This way, the older "rows and fields" will be visible on the data card—still, they won't accept whatsoever mapping functionality to their corresponding rows on the confront of the drawing.
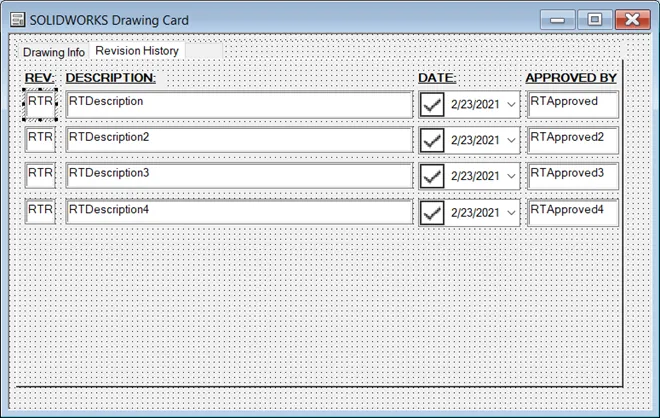
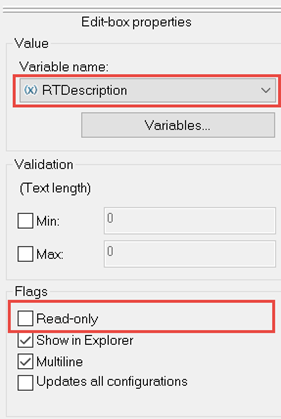
Going over to the data carte itself, we need to create an appropriate control for each field in the table. Here I will add together a couple of edit-boxes for Revision and Description, a appointment field for the Date, and an edit-box for the Approver's initials.
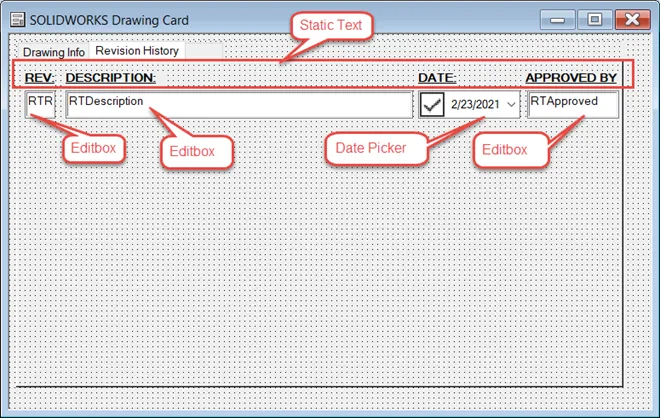
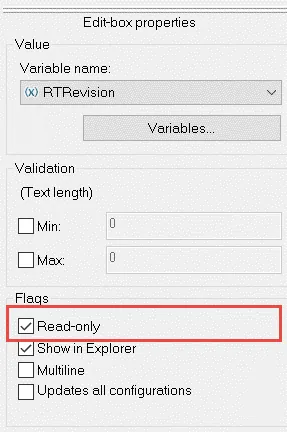
For flags, my intent is that Revision, Date, and Canonical, are controlled by PDM, so I volition set each command accordingly as read-only.
As for the subsequent rows, I will copy and paste them like and then and align them to look dainty.
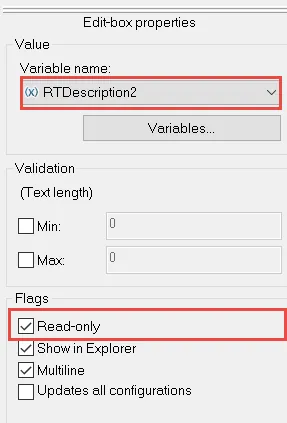
One quick note is that the description for all the "old" rows should also exist set to read-only—recall that these aren't actually connected to anything on the face of the old drawing anymore. Otherwise, a user could accidentally "desync" the data card and the drawing.
Creating the Workflow Transition Deportment
This is where things get a picayune wearisome and tricky. First, consider when the cosmos of new rows in the table should take place. In this case, it occurs during the transition "New Release" where an existing release is moved back into WIP in order to brainstorm working on a new revision of my file.
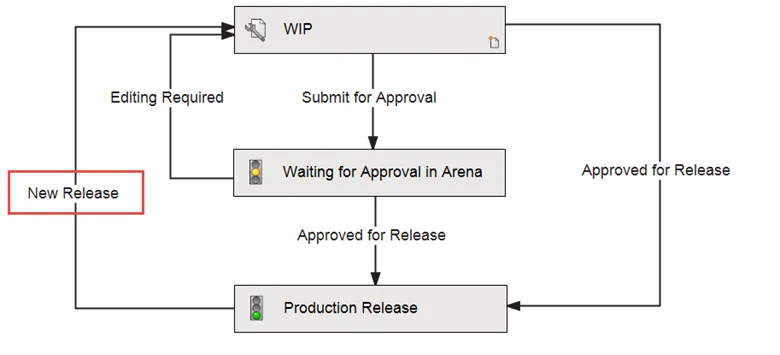
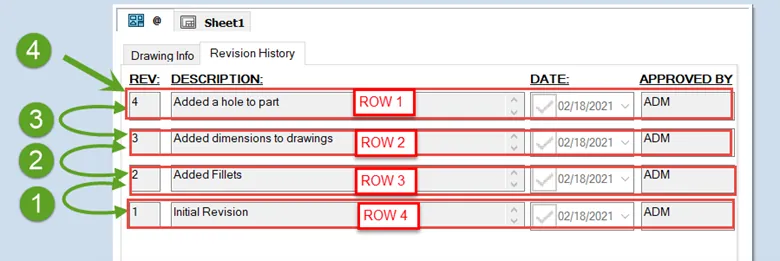
To review what has happened to the revision table on the file in other portions of the workflow up to this signal in the Production Release State:
- Revision contains the revision value most recently released.
- Description has been manually filled out past the user while previously in the WIP state.
- Date contains the day the drawing was released and was automatically stamped by the Approved for Release transition.
- Approved contains the approver's initials which were automatically stamped by the Canonical for Release transition.
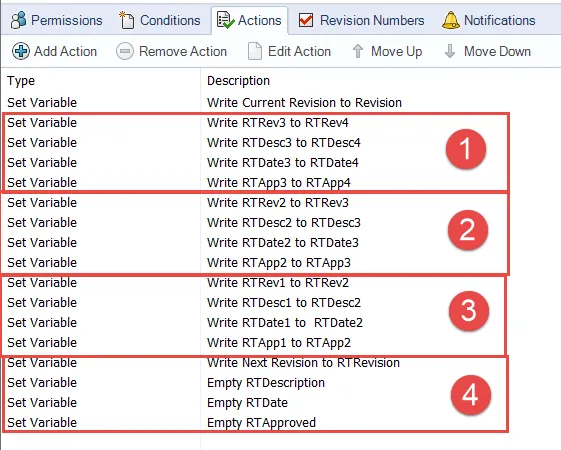
Moving forward to the New Release transition. The best way to visualize the transition actions needed is to see them happening all at once in the correct order. Run into the picture shown beneath.
Breaking the steps down further:
- Copy existing Row 3 to Row iv
- Write contents of variable RTRevision3 to RTRevision4
- Write contents of variable RTDescription3 to RTDescription4
- Write contents of variable RTDate3 to RTDate4
- Write contents of variable RTApproved3 to RTApproved4
- Copy existing two to Row 3
- Write contents of variable RTRevision2 to RTRevision3
- Write contents of variable RTDescription2 to RTDescription3
- Write contents of variable RTDate2 to RTDate3
- Write contents of variable RTApproved2 to RTApproved3
- Copy existing 1 to Row 2
- Write contents of variable RTRevision to RTRevision2
- Write contents of variable RTDescription to RTDescription2
- Write contents of variable RTDate to RTDate2
- Write contents of variable RTApproved to RTApproved2
- Make a new empty row
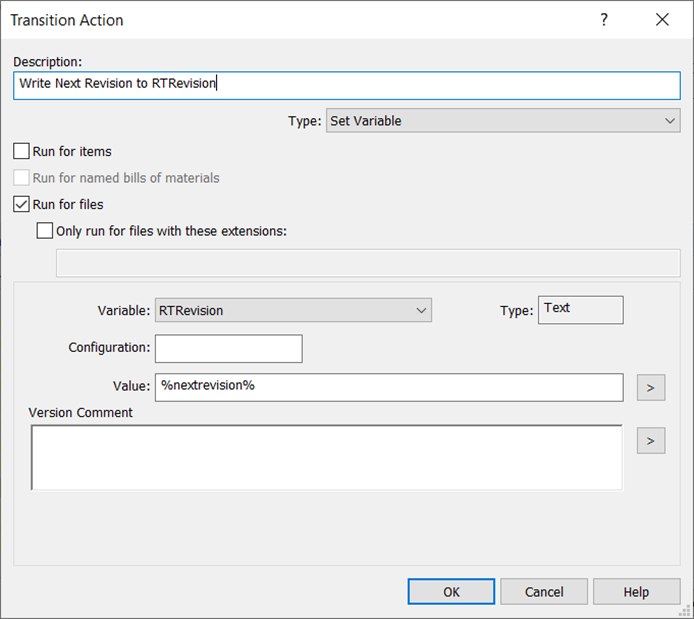
- Write next Revision to RTRevision
- Clear RTDedcription by writing a blank value
- Articulate RTDate by writing a bare value
- Clear RTApproved by writing a blank value
Not shown here, all other Transition Actions as desired
- Print to PDF
- Write watermark to drawing
- etc.
Notation: These deportment are yet happening for the commencement three revisions of a file even when a new Revision Table is growing to its full length, but since they are writing cipher to naught, it does non matter.
It's important to do the "rows" in this order as we want to make sure the second oldest row (Row 3) gets a hazard to offload its information before information technology gets overwritten with the information from Row 2.
Taking a closer look at one of the actions, they are elementary variable write actions that have the existing column value of Row 3 and and then copies it into the post-obit Row four.
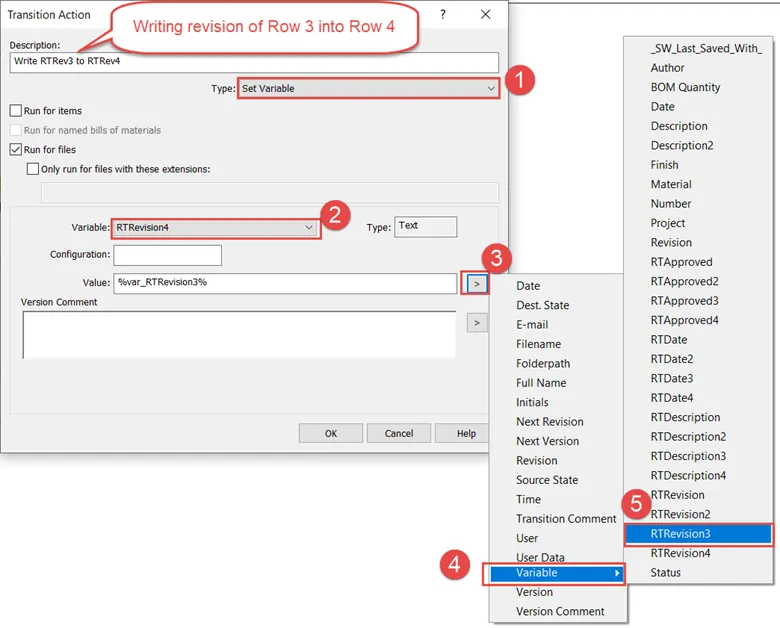
To create this activity of copying the Revision of Row three down into Row iv:
- Fix Type of Action to Set Variable
- Select the variable of the field of the row nosotros are writing to (i.due east. the row below the one nosotros are shifting downwardly)
- Use the pointer option in the Value field to open a list of system variables to choose from
- Select the Variables option for a list of user-divers variables to choose from
- Select the respective variable of the field that is "shifting downwardly"
The same will exist done for all other fields in all other rows. As for the final cluster of actions, we'll care for this every bit a typical set of actions that generate a new empty Row.

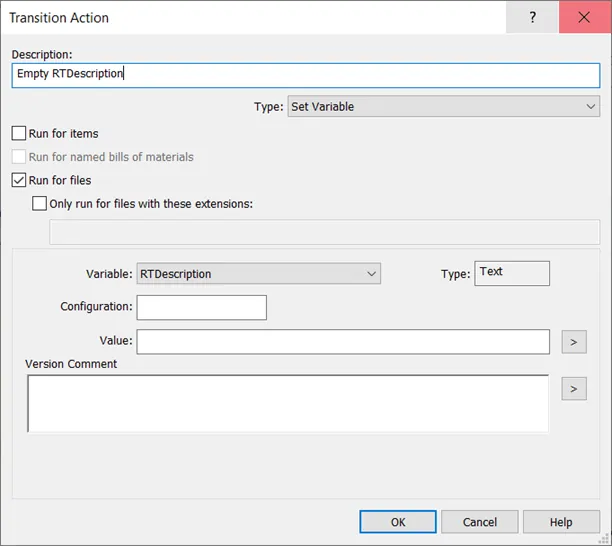
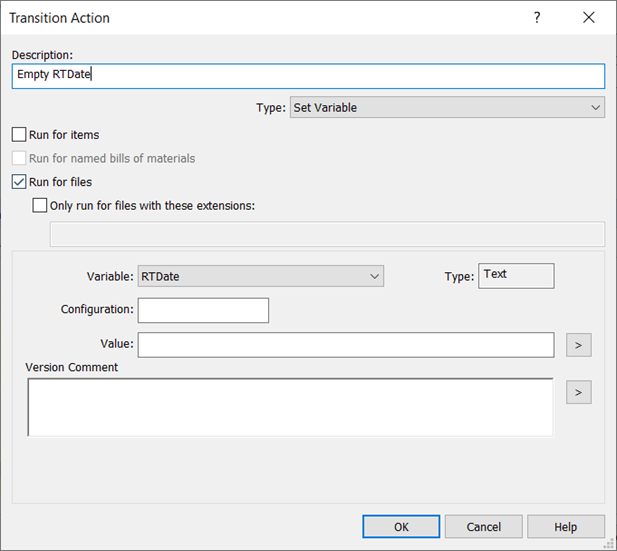
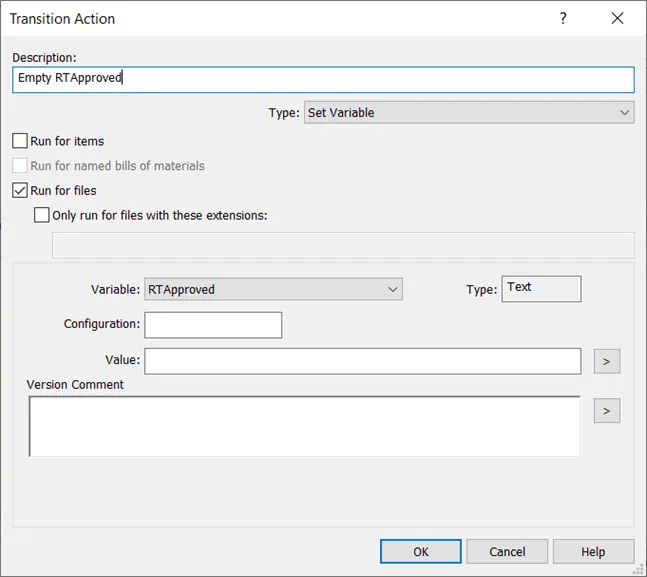
Notation: By default, when the SOLIDWORKS Revision Table characteristic is triggered to make a new revision row, it volition as well tend to populate the Date field with the current date as defined by i'south local computer time which may not be desirable. To avoid this, the variable write action is bare to purposely empty that field.
Decision
Now with all the pieces in identify, we tin see the finish result and it works! Instead of just a unmarried row, the data card now reflects the previous revision table information as well. And, much similar whatever other PDM revision table integration, the most current row interacts with the Revision Table on the drawing itself.
If multiple revision cycles need this similar behavior in other transitions, then copying and pasting the transition and renaming it is perfectly valid. What matters most is that the order of deportment is correct, otherwise, some rows might become duplicated or emptied improperly.
Limitations and Considerations
Equally mentioned previously, the other "rows" are read-only not considering we don't desire users editing past values, simply more because they don't practise anything—there's no interaction betwixt older "rows" and the drawing itself.
Additionally, scaling this to more rows is incredibly tiresome, as there's no manner to copy and paste individual actions within a transition or betwixt transitions in a workflow. Just unabridged transitions can be copied and pasted within a workflow.
Lastly, this feature still does not set up the biggest weakness of revision table integration—deviation from the workflow for the cosmos and deletion of new or past rows. If you accidentally make a new row, there's no back button. If you delete a row manually, it'south gone forever. Every bit far as PDM is concerned, the best way to maintain tabular array functionality in the case of an accidental row is to do a rollback.
Related SOLIDWORKS PDM Tutorials
How to Update Templates in SOLIDWORKS
How to Adjust Templates Settings in SOLIDWORKS
Allowing SOLIDWORKS PDM Users to Update Version History Comments
Controlling Access to Versions and Revisions in SOLIDWORKS PDM
Using PDM Templates Inside SOLIDWORKS
Source: https://www.goengineer.com/blog/solidworks-pdm-full-revision-table-drawing-data-cards
0 Response to "box on table 3d drawing"
Postar um comentário